Showing posts with label kitchen. Show all posts

12 October 2010

{oooh bungalow kitchen looking good}

(and heyyy does the post title make you wonder if i've had a glass or two of wine? ... because maybe i have. but while we're on that subject, let me tell you my favorite wine as of late/alllll summer: cupcake sauvignon blanc. also a little wine tip: if citrus flavored wines are your fave white wines but you know little about white wines in general, you should always order the new zealand savignon blanc as they are never too sweet but always citrus and summery.) annnnyways...

did you even realize that i haven't really posted a real photo of the bungalow kitchen since tile + paint has been completed? remember the very beginning? and now here we are -- as up to date as it gets on s&s...
and don't you love a vintage chandelier in the kitchen? especially a $35 one.
credit is owed to friends lilytheinteriordesigner & danielthearchitect who said wouldn't it be even more lovely to paint the outside of the shelves the same polo blue as the inside of the shelves? (and if you clicked on that polo blue link, it looks nothing like that in real life)
and how right they were. it unifies the kitchen and adds such a sophistication to our small cooking space. by the way, did you even notice my roman shade adorning kitchen sink window?? i made it myself. and promise to give a tutorial one of these days as it was easy as pie. custom roman shades are expensive to buy but easy to make, so which do you think i chose?
view back to the dining room that still is without chairs (or rather, chairs are preoccupied on the porch getting a paint job..)
here's a before shot from almost the same angle.
and here's the stove side with newly {home}made curtain for pantry shelf. love mattress ticking and all, but eventually i'll change it out for something different. oh and finally cabinet doors are returned to the storage above the microwave. ta da!

17 June 2010

{everything shelf}

found petite metal shelf at old antique/junk store in the country. should have taken a before picture as it was covered in grime and rust, but the urgency to spray paint it a cheerful french blue got the best of me. floral painted gourds are from a favorite trip to cozumel.
an ideal catch-all by the back door. needlepoint seahorse & baby oil painting from various antique/junk stores. green filigree hooks from anthropologie.
and in case you were wondering about a before photo.
notice the door trim has now been caulked and painted {caulking & painting trim is one of the less dramatic things that has been happening all over the bungalow for the past month or so}

04 May 2010

{backsplash finished}

the backsplash tile has been up but i'll be honest, i've been putting off grouting. it sounded intimidating and messy, but finally couldn't be ignored any longer. and to my surprise, it ended up being a lot easier than i anticipated and makes the kitchen look so much more polished.

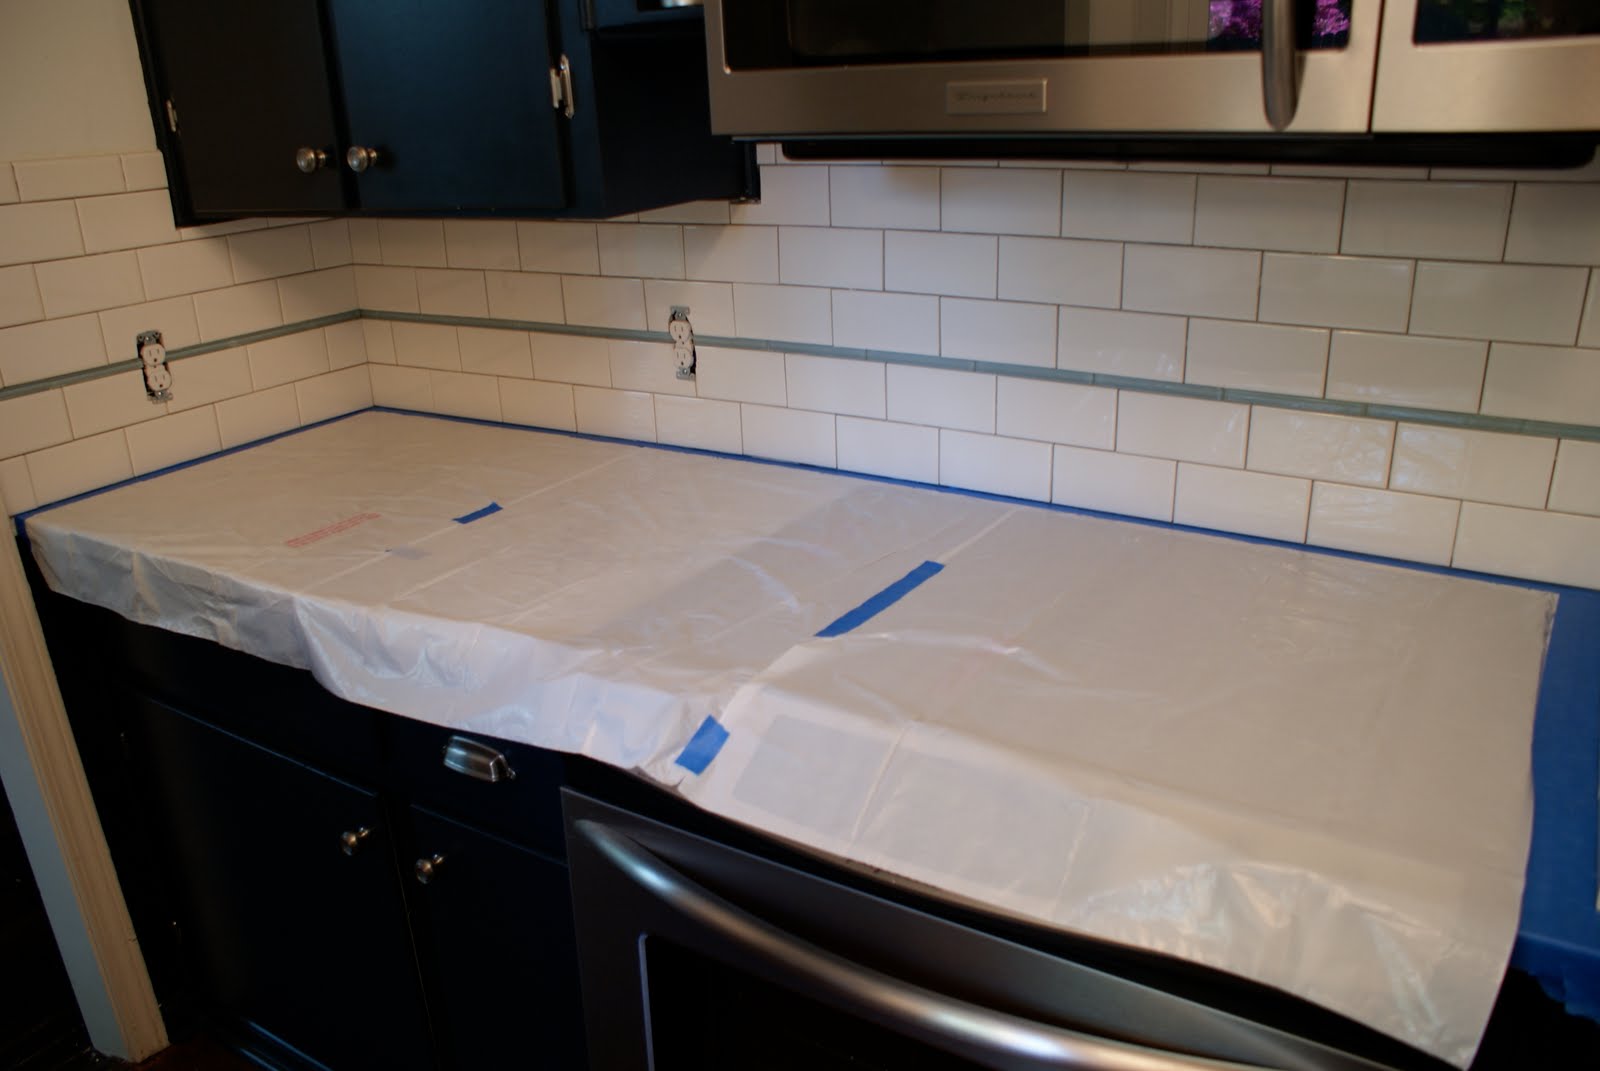
here's the before picture, along with the prep work to make sure the counters were protected {carrara marble is very porous so to protect it i just used cheap-o trash bags and painters tape}

here's the other side all ready to go as well.
here are the supplies used for grouting. i was thinking gloves would be much more necessary than they were and actually found they got more in the way and made for a messier grout job so about a quarter of the way through, i ditched the gloves. grout comes off your hands pretty easily when it's still wet, so it's really no big deal not to wear gloves. the tools you see pictured are called floats and come in various sizes for smaller spaces and corners. i also found that i had to use my fingers in a few tight spaces, which worked just fine. finally is the grout sponge which is used to wipe down the tile and keep the grout only in the lines. you can find all of these things in the tile section at lowes. though i will say, if you are looking for a colored grout, you might be better served to go to a tile shop for a bigger selection.
mixing the grout {note - this particular grout is unsanded because the gaps are so small. if you are grouting a different area with larger spaces, you may want a sanded grout --i.e. has little particles of sand in it-- definitely ask around or consult the internet if you are unsure of what kind you need}. you can mix it by hand with a paint stick but we bought a metal mixer that can be attached to a drill and it made the job a lot easier and faster.
this is taken after applying the grout with a float -- obviously it looks messy here and will be for a few minutes until it sets enough to then wipe it down with a sponge. read the instructions on the bag to make sure you wait the right amount of time. i think it was only about 15 minutes.
and the final step is wiping down the tile with the sponge and here's how it looks.
finally can put faceplates back on and set up shop.
i will also say that caulking the gap where the bottom tile and the counter meet is highly recommended. you can grout that line but caulk is much more effective in keeping potential splashes of water from getting behind the counter. and really, if you are using white grout, it blends right in.

all in all, grouting the backsplash was a much easier project than i'd expected and i completed it within a few hours.
more to come, as always.

09 April 2010

{backsplash beauty}

first foray in the world of tiling seems to have been a success. haven't added the grout yet but the layout seems to have come together quite nicely. and just in a weekend {plus or minus a few afternoons since lowes did not have enough tile in stock the first weekend around} our kitchen is transformed from ugly wallboard to gleaming subway tile {and at $.24 a tile from lowes, you can't beat the cost}

and let me tell you, you can do it too. here's how we started in the corner with every other subway tile cut in half to give us the beginning layout for a bricked pattern. those green circle things are the spacers and are important in keeping the tile from sliding.

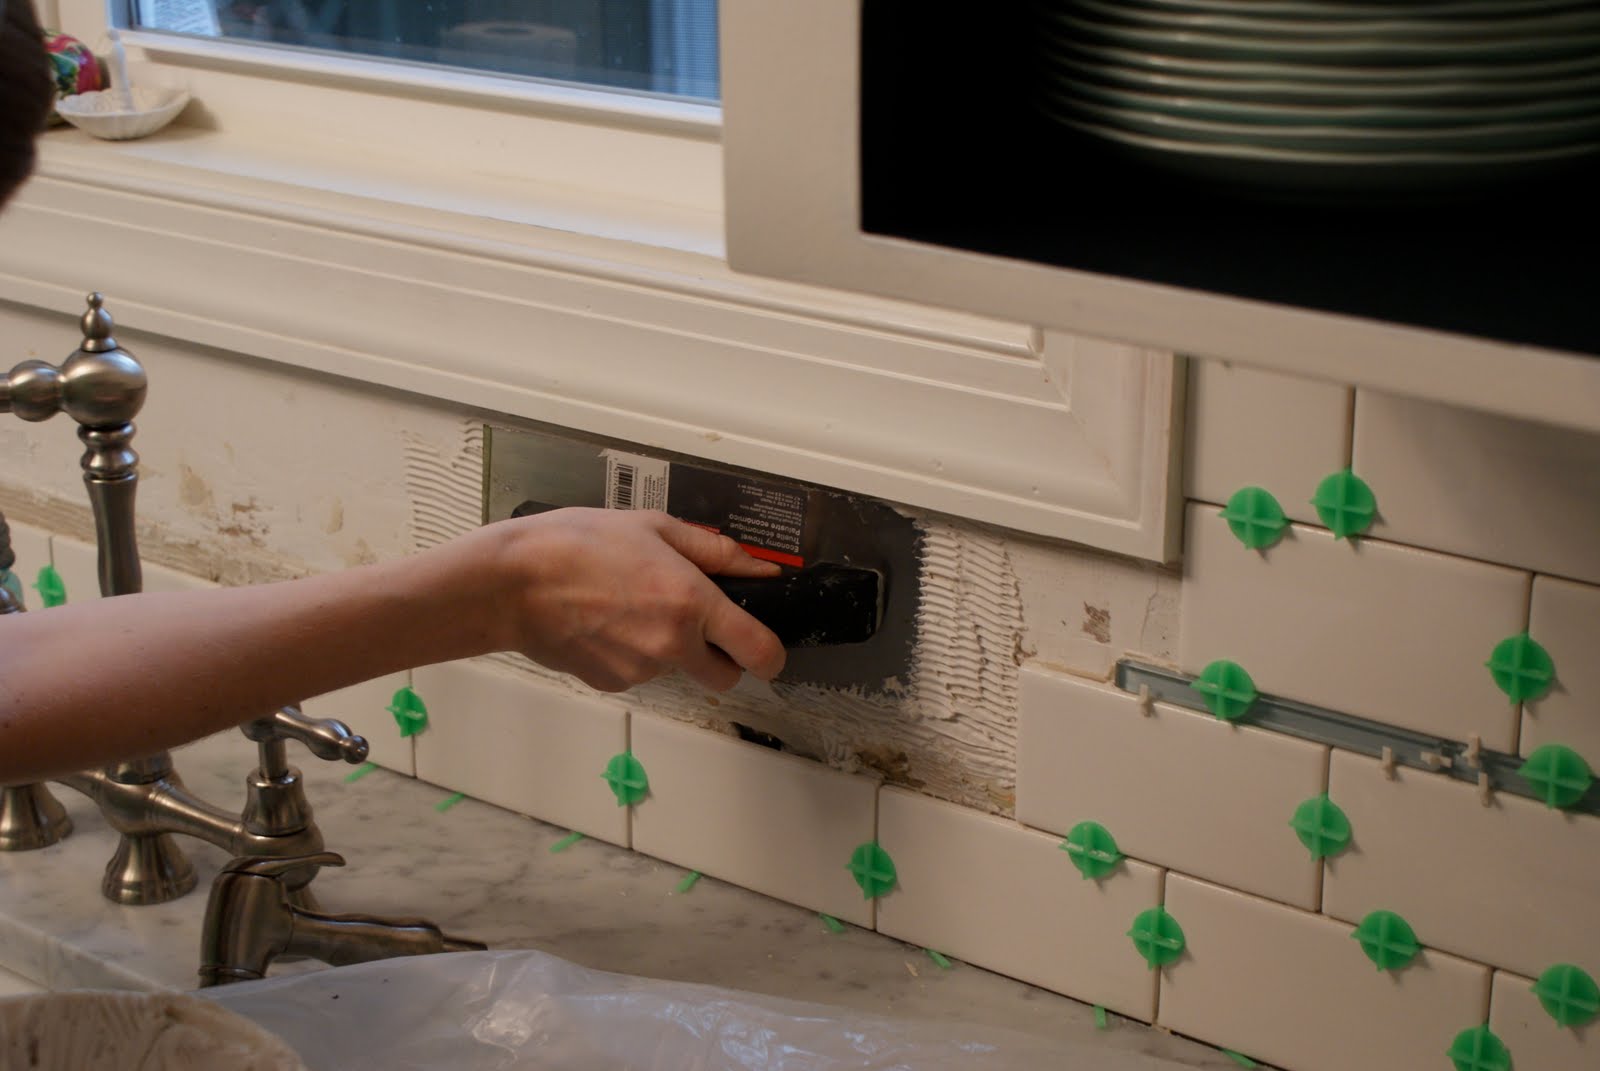
first you coat the wall with adhesive which is a very similar consistency to spackle and not very sticky, so it's easy to clean up if you are a messy tiler. the tool here has grooves in it to give the tiles a greater surface area on which to stick. {note-if you are laying larger tiles the tool you use should have larger grooves} you can also see in this photo the skinny aqua glass tile in the middle with smaller white spacers since the green circle ones were too big. glass tile is much more expensive than subway tile so this is a way to get a more unique look that is still low cost.

and here's the sink side waiting with all the spacers for the adhesive to dry overnight

another view.

the trickiest part of tiling is tiling the areas that are smaller than a full sized tile.

here's the tool we used to cut the tile to fit in all those smaller spaces. cutting tile sounds intimidating but it's really easy and this tool {i forget what it's called...tile cutter?} is available at lowes for less than $20 {though if you need a bigger one for larger tiles, it increases in price as you increase in size. but i think even the biggest sized one was under $75} basically what you do is measure the tile, mark it with a wax pencil, score it with the tile cutter...

and then use the tool to snap the tile along the line you just scored.

here's a zoomed out view of the workspace. the small bucket of adhesive on the left was more than plenty for both sides of our kitchen. also note the green handled tool on the right corner of the counter. these are tile nippers and are really useful for cutting tile to go around outlets.

and finally a view without green spacers.

as for the outlets, they are by far the biggest pain of tiling. one of the good things though is that you can lay tile right over imperfections of the wallboard.

here are a few close-ups of tiling around the outlets & switches. oh note that the bottom metal part on the outlets/switches has to go over the tile. meaning you have to unscrew it and then fit the tile behind it. otherwise, the tile wouldn't lay flat and the outlet would be too far recessed.

the cuts definitely don't have to be perfect or even because...

you just pop the covers over them and no one ever sees.

more to come in the world of grouting!

have a wonderful weekend! sorry for the lack of posts this week, have been having trouble with the blogger website.

19 March 2010

{carrara kitchen}

big strides -huge- in our bungalow kitchen: farmhouse sink + countertops + new faucet have arrived. before scrolling down much further, remember the kitchen before? and the old countertops? welcome kitchen, to 2010.

we had tried sanding down the old countertops {which were not actually butcher block, but pieces of hardwood flooring...guess someone had some leftover?} but the end result was less than pleasing. the seams that are inevitable in flooring left gaps in places for food crumbs to hide and left us dustbusting {just to be clear, by us, i mean me} way more often that i care to admit. plus, when it came to installing the new sink, which is an undermount sink {meaning it sits underneath the countertop--which is a *dream* for wiping down countertops--and yes, i have dreams about counters. especially clean ones.} the edges of the hardwood flooring would a)-be rather unsightly next to new gleaming farmhouse sink and b)-are porous and not at all ideal to sit in close proximity to running water. plus, as it turns out, requiring a carpenter to work with said old countertops when installing new farmhouse sink, would require precision cutting = much more expensive. so ultimately the decision was made to put that money towards new countertops {natural stone is also a selling point if/when we ultimately decide to sell our bungalow; i.e. we should be able to get our money back when selling}. i should also add that we have very little counter space so that was the real key to keeping costs low for new counters. below is the kitchen when we were working with old counters sanded down + old sink + different new faucet.

below was the state of things for a solid week as we waited for the countertops to arrive. note to readers--be sure to schedule carpenter who rips out counters/installs sink + people who install countertops to come a day apart rather than waiting for carpenter to arrive before deciding on counters.

but being no strangers to living in construction mess, two weeks later, we found ourselves with this for our kitchen... also three things - 1)-apparently am married to a plumber and didn't know it -- b installed the new faucet {and replaced all the old piping under the sink} completely and 100%-ly on his own. amazing. 2)-notice my sweet chandelier? will do another post about its origins & subsequent makeover, but you should know it was only $25. which is awesome seeing as i can't say that for all the other lighting fixtures in the bungalow. and 3)-maybe you remember the original farmhouse sink found on craigslist? yes, well, turns out purchasing sink before bungalow doesn't always pan out as planned. said craigslist sink, was wayyy too long to fit in our tiny kitchen. so found another one at online discount store and original sink is back on craigslist {need one??}

view of carrara marble counter by the stove. i would really like to get these appliances off the counters, but am at the moment without a solution... oh -a note on carrara marble- while beautiful, it wears much more than granite or other harder natural stones. meaning if you are the type to get a little boozy and leave red wine rings til tomorrow, these counters are not for you.

annnnd a wider view. and holy pantry! curtains are in the works, if i ever pick out a proper fabric. {usually there's just a clothespinned dishcloth} but remember when b finished the pantry space? and remember before that, the gaping ugly hole where a wall mounted oven used to live? also, you'll notice that we are missing two cabinet doors...when the microwave was installed, it took about 4 inches off that cabinet, so we finally have had the doors cut down and they are currently in the process of being painted. also, we still need to drill holes for cabinet knobs.

another view -- this one really shows the eyesore that is the unfinished backsplash. not for much longer though...

annnnd this weekend, that is exactly the project. come to find out subway tile is about as cheap as it gets at 24 cents a tile. amazed to find this out as am used to having expensive taste. turns out, subway tile only looks expensive with its classically vintage style. still thinking about incorporating not as affordable glass tiles... updates to come on very first tiling job. supposedly it's not too difficult.

happy weekend! p.s. if you're in the area, we are having a garage sale tomorrow {7 am start time, yipe!} after cleaning out the storage unit kept while living in a one-bedroom apartment, turns out we don't need really any of it. funny how living without something for 2 years will do that to previously thought of treasures.

13 January 2010

{cabinets continued...}

making great strides with the kitchen, until...

and the culprit is banned from the painting area (which was somewhat difficult considering the bungalow in its entirety is a painting area)


but on to the real accomplishments from the past weekend :: fixing up the lower kitchen cabinets. remember under the sink before?

just needed a replacement floor in the form of cabinet grade 1/2" plywood.

cut in two sections made it simple to pop the new cabinet floor into place.

caulked & painted (first coat only at this point) it's fresh & new. {just a side note - will soon do a full post about the wonders of caulking and how it can change. your. life.}
on to the cabinets on the other side. before, the floor was completely missing, as this cabinet supposedly used to house a small hot water heater.

popping in this plywood floor looks a lot easier than it was to actually accomplish. it involved first building a level platform underneath with scraps of old wood. also notice the old tin stove pipe poking up through the cabinet on the right.
simple tin snips did the job to cut it down enough to lay the piece of plywood right over it.
if you click on the below photo to enlarge it you can see how we have caulked {<3}>
and even with just a first coat of paint, brand new.
finally dear reader, do you remember promises of big plans for the huge hole left by the old wall oven? confession, after much discussion, we opted out of original big plans-which were to create a lattice wine rack and wine glass storage {yes, i know, would have been so neat}- for something a bit more practical. after living in the bungalow for a month & change, come to find out there is no logical pantry space. so...
newly realized skilled carpenter, b, cut bottom & side for our new pantry {this is 3/4" plywood -still cabinet grade- in case you were wondering.}
adding a 3/4" square trim piece to the raw front edges of the wood adds finishing touches and helps to blend seams with original kitchen. b added support in the form of quarter round and a piece of 3" wood at the top. a shelf provides better use of the space {here just nailed in pieces of the 3/4" trim on either side and topped it with the shelf, so it is removable if you like}
and painted, it blends right in. plans, at least for now, are to stick in a spring rod with a cafe curtain {perhaps an old grain sack?} to keep it from cluttering up the kitchen. eventually there may be moves made to create cabinet doors {thinking with old windows maybe?} but for now, we have bigger priorities...
also, apologies again for poor photo quality. it seems photos are often taken in the evenings when the light is never optimal.
still more to share from the past weekend...soon.